A failure to introduce the arthroscopic camera and instrumentation properly may leave the surgeon totally disorientated.
 First published by knee surgeon Angus Strover in 2008, and reviewed August 2023 by Dr Sheila Strover (Clinical Editor)
A system of examination from the standard portals
I am going to start this section by explaining what can happen if the first portal is wrongly positioned.
If it is placed too close to the patellar tendon, one might lose one's way in the body of the fat pad, which lies just under the tendon. All the surgeon will see is a bright yellow colour, and not the shiny white surfaces you are starting to recognise. Removing the obstructing fat can be traumatic, and the patient can be left with a scarred and painful fat pad, and even the serious complication of 'infrapatellar contracture syndrome'.
If the first portal is too low, then it will be below the meniscus and tibial plateau, and it will be difficult to navigate the arthroscope to the other side.
Continue to the next bit to see the kind of mess an amateur finds himself in .... Click the arrow under the play to start the video. If you cannot get the player to work don't worry - I will also show some still images to demonstrate the principle. Please note that there is no sound.
This is an example of how NOT to do an arthroscopy. The surgeon is lost in this knee - he is desperately hunting around to find a landmark he can recognise.
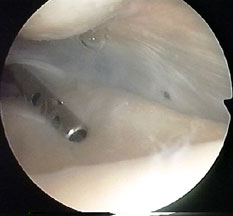
Here are a couple of stills from the video, which just showed a swirling mass of undefinable tissue -
 |
This could be the fat pad - who knows? |
 |
A beginner can spend hours trying to orientate himself when the image looks like this! |
 |
To make sure my students are confident about the first portal, I turn again to my trusty Adam Rouilly model to show them where they should expect the scope to be positioned once they enter the joint. |
 |
Compare the amateur's view with this crisp image ... Need I say more? |
I mentioned before the possibility of using a wide-bore inflow cannula to ensure optimal pressure using a pressure pump. Here is a picture of this cannula.
Now I am going to take you through a more expert diagnostic arthroscopy, step by step. If you cannot view the videos, there will be an opportunity each time to see stills. I am going to show first video again. This time you will appreciate how clear the image is. Note:
- how the surgeon explores both above and below the meniscus
- how he is feeling the integrity of meniscal and bony surfaces with the tip and the side of the probe
- how he pulls on the outer edge of the meniscus
- how he checks the posterior horn of the meniscus. The anterior horn is more difficult to see from the original antero-lateral portal, and he needs to change portals, as I will discuss later
Click the video arrow button to start the video... See how after fully examining the meniscus and joint surfaces on the medial side, the surgeon swings the probe over into the notch to explore the cruciate ligaments ...
| On the right are still images for those of you unable to play the video. | |
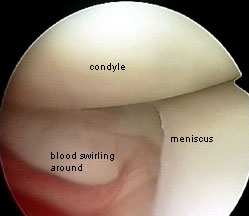
| I have labelled the important landmarks for you. The rounded white condyles are important in orientating yourself. To the right the tibial plateau is being examined. The hyaline cartilage covering the bone here looks a bit thin and pink coloured. |  |
| Here the probe has located a damaged area of the tibial plateau. |  |
In this next video the probe is in the notch. The surgeon is trying to examine the cruciate ligaments. At first glance looks as if they are fine. But when the surgeon tries to pull on them with the probe, he discovers that what he is seeing is not the cruciates at all - but a filmy infra-patellar plica masquerading as a cruciate! Such plicae are not always present. After 'hoovering' away the plica, the real cruciate is revealed below. Now pulling on it tests its true integrity.
From this position, still with the scope in the original portal, the surgeon can slip the probe round the back of the cruciate and test the posterior horn of the lateral meniscus, the body of the meniscus and the joint surfaces as before.
| I'll show you the stills again here. To the novice, the cruciate seems to be filling the notch, and looks normal. The probe, however, can slip easily into the filmy material - and the experienced surgeon identifies this as an infrapatellar plica covering the real cruciate ligaments. |  |
| A high speed rotating instrument is used to quickly cut and suck away the filmy plica, with the teeth pointing upwards to avoid harming the underlying cruciates. |  |
| Now the surgeon can confidently test the integrity of the cruciates, by pulling on them firmly. | 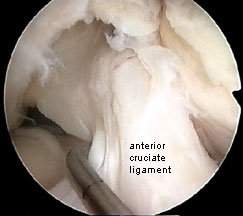 |
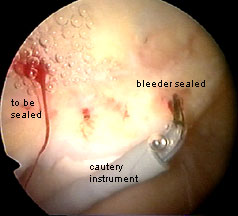
And while I am talking about problems, I just want to mention again the issue of bleeding. It is quite easy to see when you have cut a bleeder. I make sure that any bleeders are cauterised.